The Biggest Upgrade Yet for Trail Planning
This is the release we have been building toward: a route planner that feels stable and intuitive on the map, plus a much deeper way to inspect your tracks once the line is drawn (or imported).
You can now plan faster with smarter snapping, import a GPX by simply dragging it onto the map, and switch between multiple analysis modes to understand slope, altitude, pace, and time dynamics in one workflow.
Plan Smarter with Snap to Skitours
When you enable Plan Route in winter mode, the route magnetically snaps to ski-touring lines. This makes planning feel clean and precise, especially in complex terrain with many nearby tracks.
Under the hood, the planner uses sticky line lock and ambiguity protection: once you start following a line, it stays stable and does not randomly jump to a parallel segment unless your intent is clear. The result is exactly what modern mapping tools should feel like: confident, predictable, and fast.
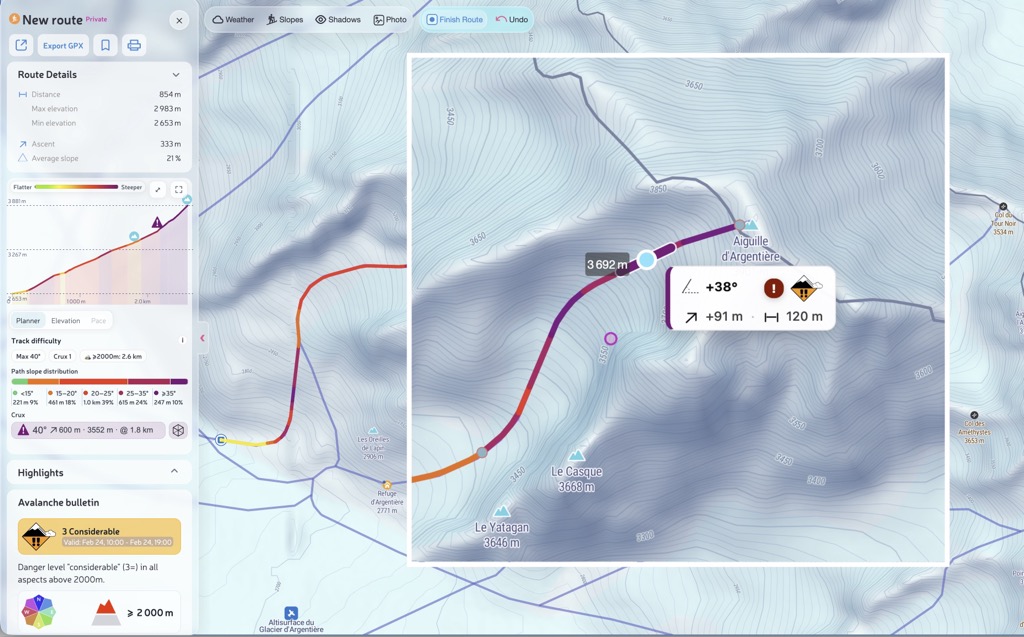
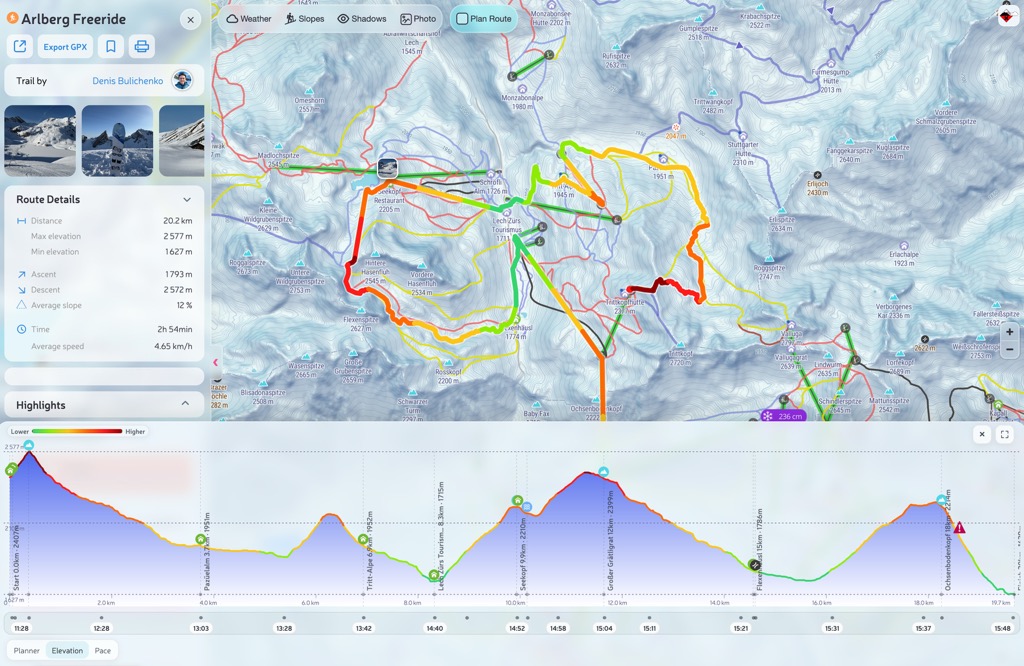
Track statistics appear in real time as soon as you place the next point. While you build the route, PeakVisor continuously updates the profile and map metrics, so you can evaluate the line instantly instead of finishing first and checking later.
On the winter map, this live feedback includes both slope analytics and avalanche context. You can slightly adjust a segment and immediately see how values change on the map. Avalanche bulletin indicators are refreshed from daily bulletin updates, so planning reflects current risk context.
Import in Seconds: Drag-and-Drop GPX
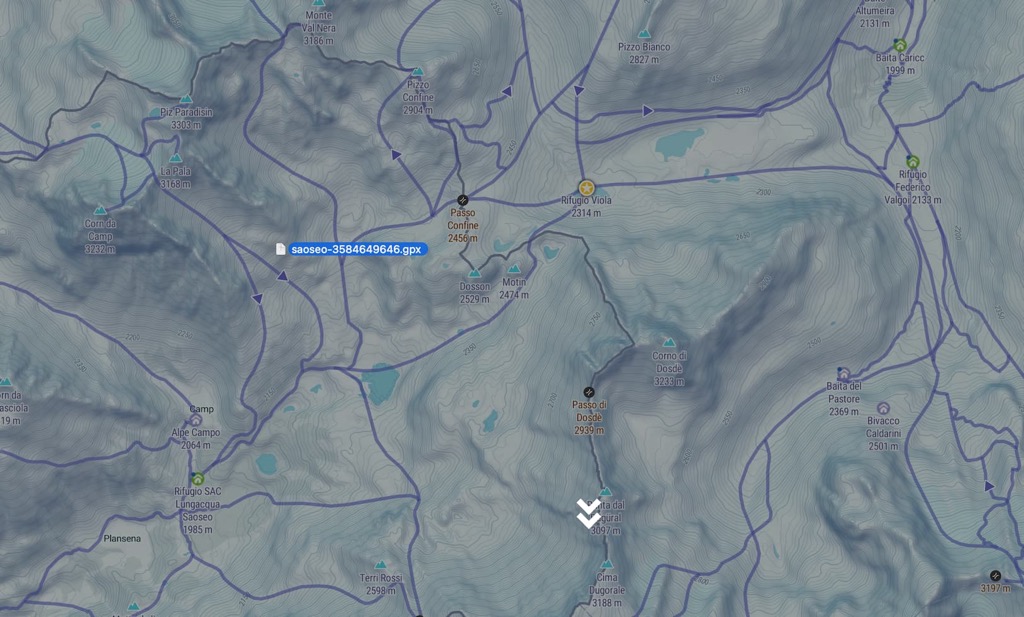
One of the most requested quality-of-life upgrades is now live: import by drag-and-drop.
Take your GPX file from desktop storage, drag it over the map, and drop it. The track appears in PeakVisor immediately with full profile context, route stats, and color visualization options. No multi-step flow, no friction.
New Track Analytics Modes
The new system introduces clearer analysis views so each question has the right visual answer. Instead of one overloaded graph, you can switch modes depending on what you need to decide.
1) Planner mode (slope-first analysis)
Planner mode colors the route by track slope in degrees (the slope along your movement path, not terrain slope of the whole hillside).
Color scale used in Planner mode:
So the visual logic is straightforward: green to purple as slope intensity increases. This is ideal for seeing technical structure and sustained steep segments at a glance.
Important: this is track slope (computed along the route line), not terrain slope from DEM. A zig-zag may look moderate here even when the hillside itself is steeper.
2) Elevation mode (altitude-first analysis)
Elevation mode colors the same route by absolute altitude. It is ideal when you want to read vertical progression, identify high-exposure sections, and quickly compare where elevation is gained or lost along distance.
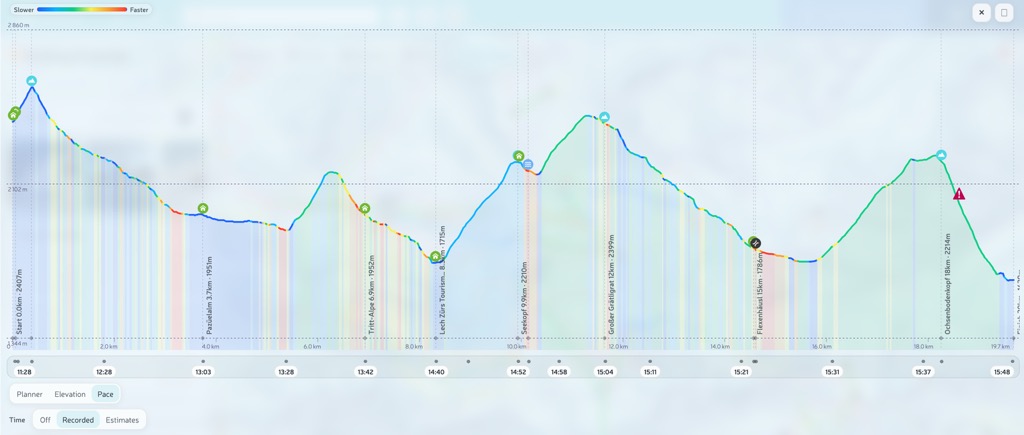
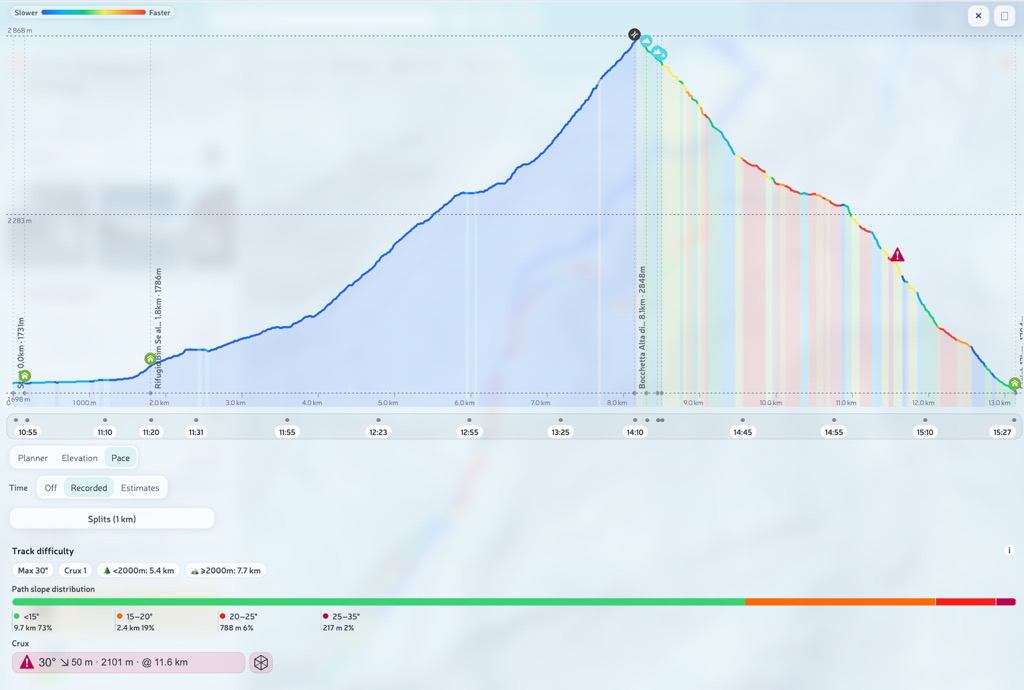
3) Pace mode (timestamp-based dynamics)
Pace mode works for tracks that contain timestamps: routes recorded live in the app and tracks imported from external devices and files.
This includes activities synced from wearables and sport platforms. If your track arrives with time data (including Garmin, Apple Watch, and Suunto workflows), it is automatically available in your profile and ready for pace analysis.
You can spot where momentum dropped, where rhythm improved, and which sections consistently consume time. In full-screen profile mode, Pace also unlocks the Splits (1 km) table with fastest/slowest laps and per-lap average pace.
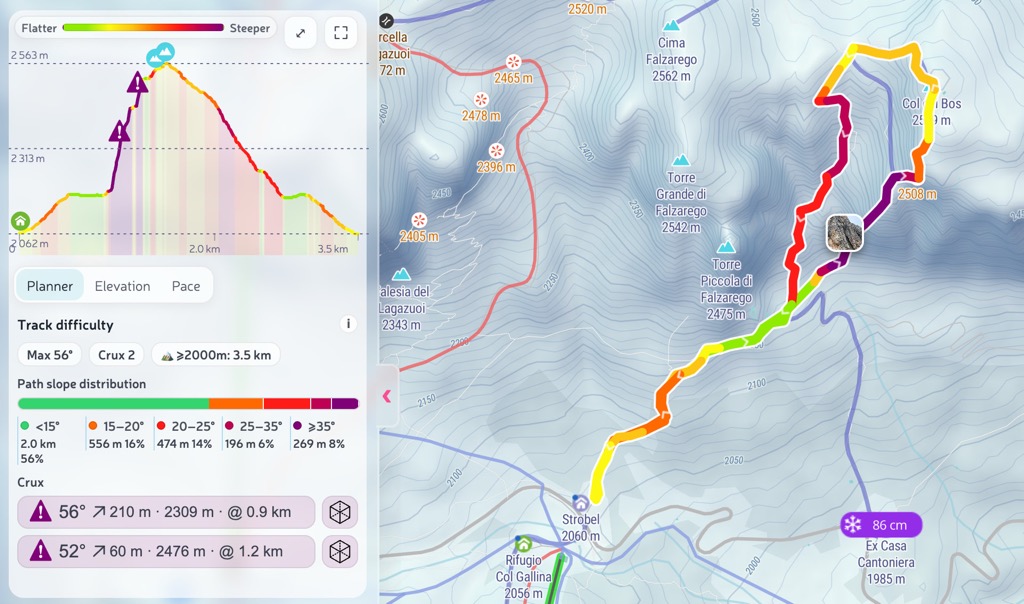
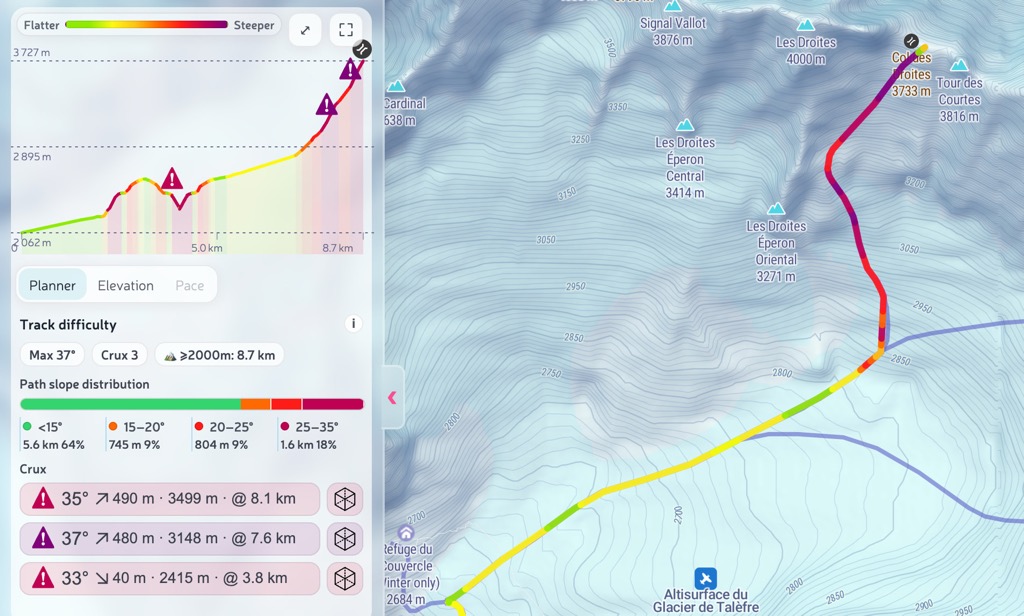
4) Track difficulty, Path Slope Distribution, and Crux
The difficulty block is shared across modes and summarizes slope behavior along the route using smoothed path slope (not raw terrain slope). You get:
- Max slope and Crux count
- distance split by elevation bands: <2000 m and ≥2000 m
- Path Slope Distribution bar with bins: <15 / 15–20 / 20–25 / 25–35 / ≥35°
Map coloring itself uses finer slope thresholds, while this summary keeps a coarser, decision-friendly scale for quick reading.
Crux highlights the top steep non-overlapping sections (top-3). Each Crux row shows steepness, segment length, altitude context, and distance position along the track.
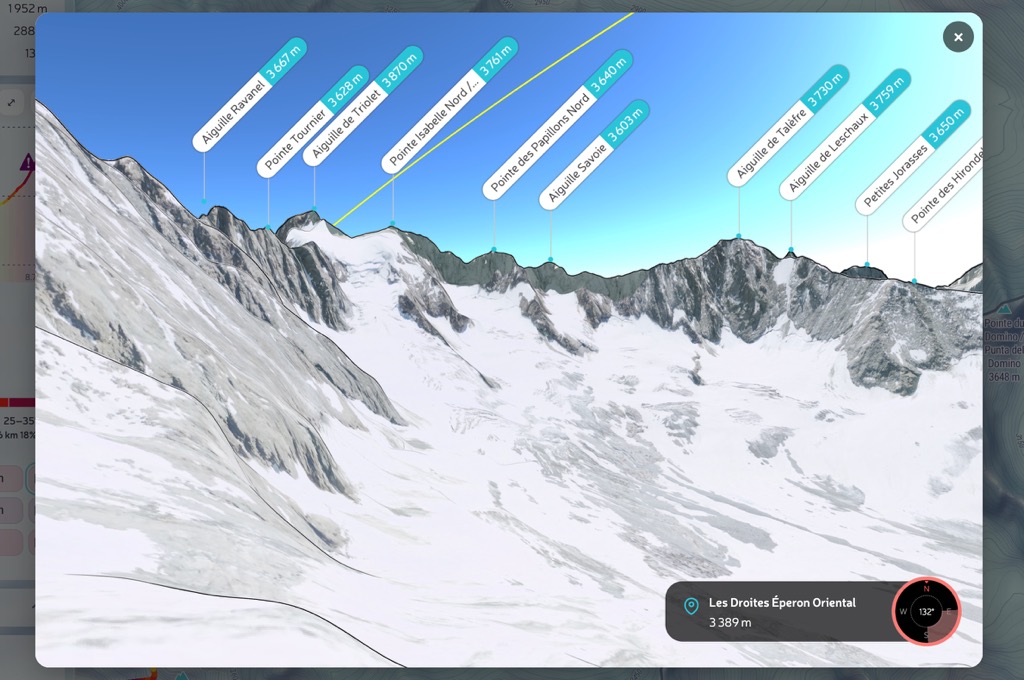
Every Crux item also includes a View 3D action, so you can open that exact section in a dedicated 3D perspective and inspect the slope in terrain context before committing to a plan.
Full-Screen Profile Workspace
On desktop and tablet, the profile has two expanded viewing states: open bottom-sheet and full-screen. In both states, you can work with all three modes: Planner, Elevation, and Pace.
Time overlays are controlled with a dedicated switch:
- Time Off - no time overlays
- Recorded - actual timeline from track timestamps
- Estimates - planning timeline based on your pace assumptions
In Estimates, you set start time plus Fast and Slow speeds (km/h). PeakVisor then calculates expected timings at milestones along the route, which is especially useful for planning with map layers like Shadows: you can estimate where you will be at a given hour and evaluate light or shade conditions on key sections.
These expanded profile states are desktop/tablet tools. On mobile, this workflow stays streamlined; for full advanced analysis on a phone, use the PeakVisor app.

Share Your Plan with Context
Sharing is not just about sending a route line. If you configured Estimates with a specific start time and Fast/Slow speeds, the shared link preserves that planning context for your team.
So your friends open the same route with the same planning setup: track mode, profile view state, time mode, and estimate inputs. This removes friction when coordinating departures and decision points before a group tour.
For link sharing, the route should be saved and public, so everyone in your group can open the same planning scenario.

Why This Matters
Great mountain tools are no longer just maps; they are decision systems. With this release, PeakVisor moves route planning and personal track analysis into the same modern workflow: draw, import, inspect, compare, improve.
If you are preparing your next big season, this is the toolkit to plan cleaner lines, read terrain faster, and learn more from every track you record.
We are building this for people who think one season ahead. Try the new workflow and tell us what should come next at peakvisor@routes.tips.
In the mobile app you can record a FlyOver video of your trail, automatically stitched with your own photos, and share it to social media.
Tag us on Instagram @peakvisor_app — we love to repost your stories.